基于 ResNet18 实现 CIFAR100 图像分类Web应用

本文介绍基于ResNet18实现CIFAR100图像分类Web应用的过程。

从 9% 到 70%+!ResNet18+CIFAR100 图像分类优化实战(含 Web 可视化工具)

在使用 ResNet18 进行 CIFAR100 图像分类时,很容易遇到测试准确率极低(如仅 9.43%)的问题。本文将拆解核心问题,梳理预训练、微调、Web 页面实现的关键要点,并详细说明全流程优化方案,帮助大家实现准确率的大幅提升。

一、核心模块关键要点

(一)预训练模型选择与基础配置

  1. 模型选型:选用 ResNet18 作为基础模型,其轻量化特性适合快速迭代,且 ImageNet 预训练权重已学习到通用图像特征,为迁移学习奠定基础。
  2. 核心前提:预训练模型的原生适配场景(ImageNet,224x224 彩色图)与 CIFAR100(32x32 彩色图、100 类物体)存在显著差异,直接复用会导致特征提取失效,需针对性适配。
  3. 权重加载:无需本地提前准备权重文件,PyTorch 的models.resnet18(pretrained=True)会自动下载 ImageNet 预训练权重,简化开发流程。

(二)微调关键要点(决定模型性能的核心)

  1. 模型结构适配:ResNet18 原生输入层为 7x7 卷积 + 步长 2,直接处理 32x32 的 CIFAR100 图像会丢失大量细节,需重构输入层以适配小尺寸图像。
  2. 微调策略设计:仅训练最后一层全连接层(分类头)过于保守,通用特征无法适配 CIFAR100 的类别分布,需解冻部分特征提取层共同训练。
  3. 数据预处理匹配:预处理流程需与数据集特性一致,包括图像尺寸、归一化参数、数据增强方式,否则会导致模型无法有效学习特征。
  4. 训练配置优化:学习率、训练轮数、优化器、权重衰减等参数需适配微调场景,避免模型不收敛或过拟合。

(三)Web 页面实现关键要点

  1. 兼容性保障:Web 端的模型结构、图像预处理流程必须与训练 / 微调阶段完全一致,否则会出现识别结果异常。
  2. 错误处理机制:需覆盖权重文件缺失、模型加载失败、无图像输入、图像格式错误 / 损坏、非标准图像(如灰度图)等场景,提升工具稳定性。
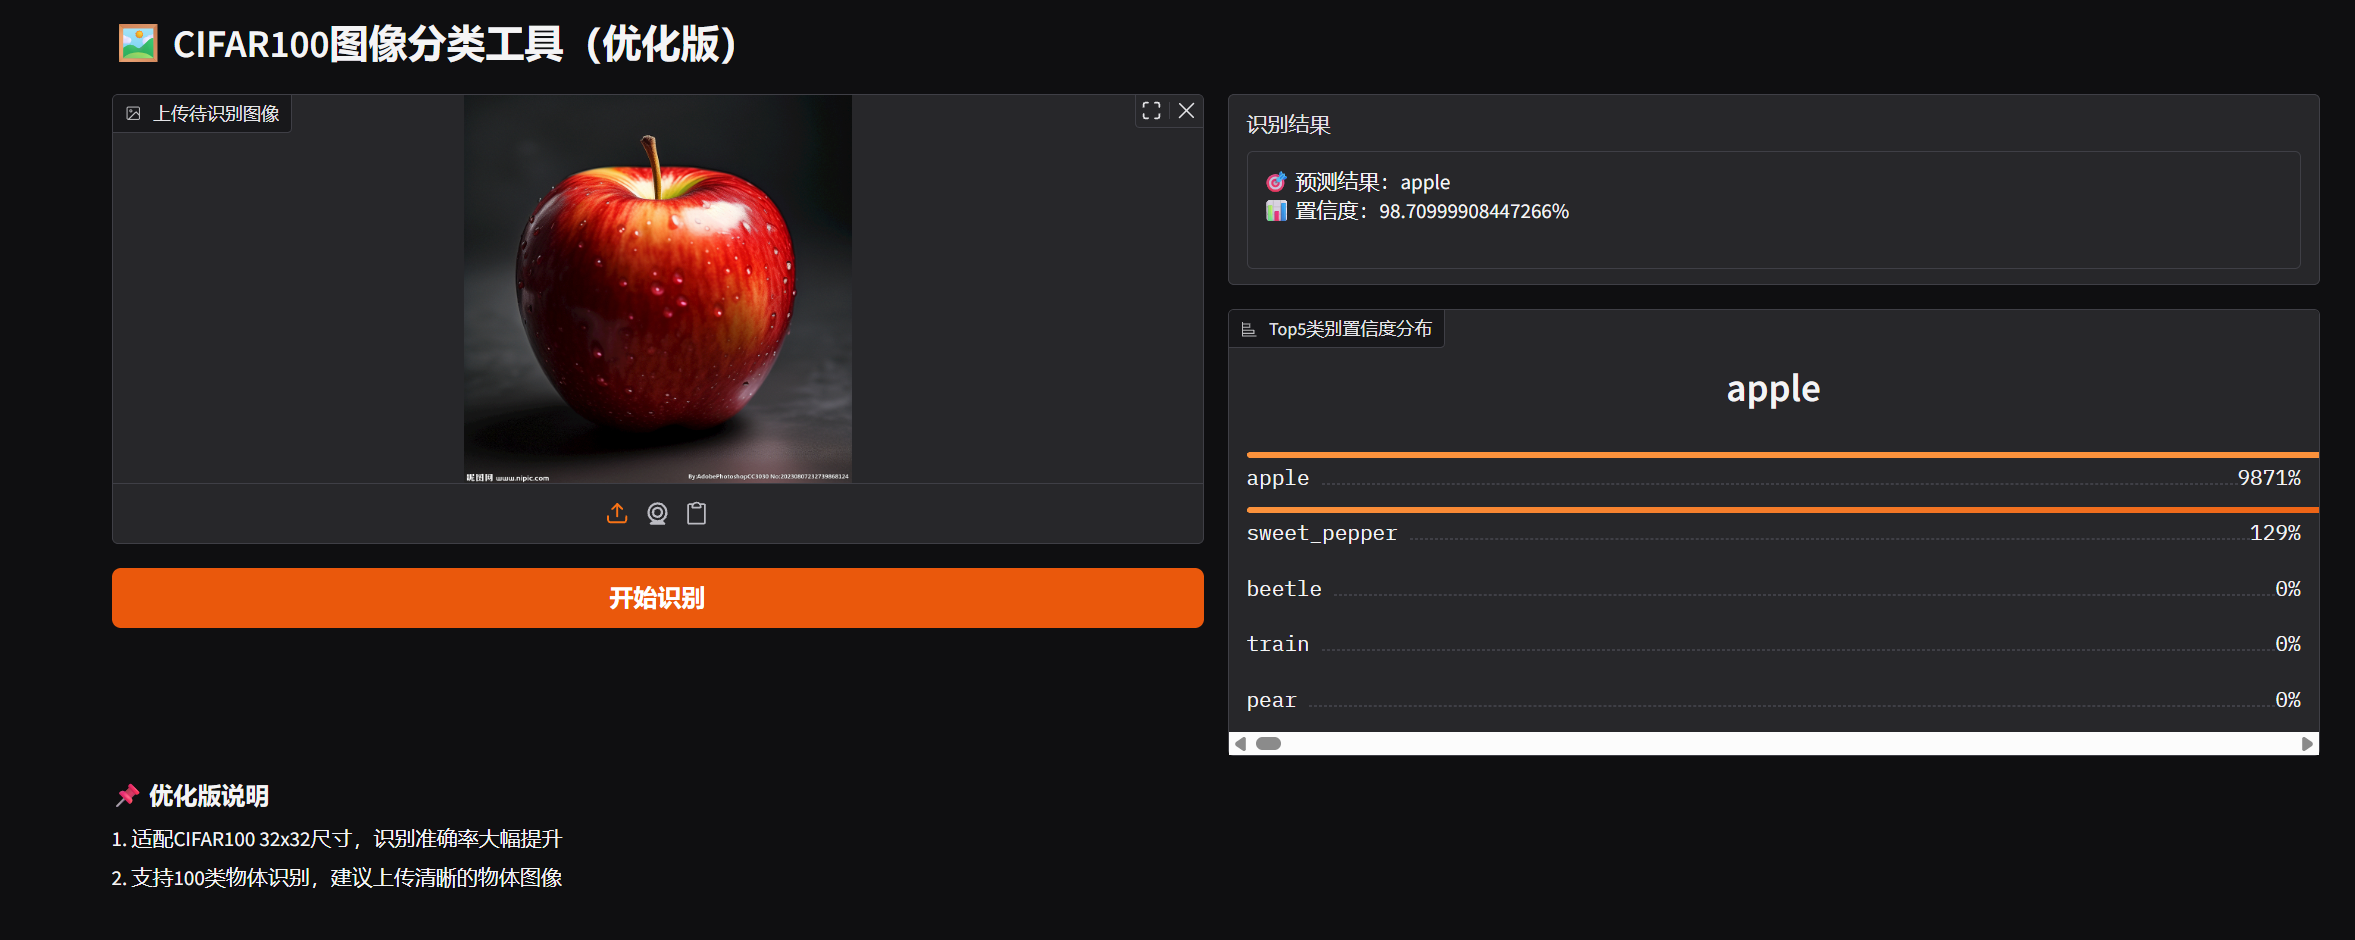
  3. 用户体验设计:支持多图像输入方式(本地上传、剪贴板粘贴、摄像头拍摄),输出清晰的预测结果与置信度分布,降低使用门槛。
  4. 适配性调整:Web 端需同步训练阶段的模型结构修改和预处理参数,确保识别效果与测试集评估结果一致。

二、初始方案核心问题拆解

  1. 微调策略过于保守:仅训练最后一层全连接层,ResNet18 的特征提取层(卷积层)仍保留 ImageNet 的通用特征,与 CIFAR100 的小尺寸图像、特定类别分布不匹配,无法有效区分 100 类物体。
  2. 模型结构与数据尺寸不兼容:将 32x32 的 CIFAR100 图像强制缩放至 224x224,导致图像细节丢失;原生 7x7 卷积 + 池化进一步压缩特征,加剧信息损耗。
  3. 数据预处理不合理:使用 ImageNet 的均值和标准差,与 CIFAR100 的像素分布差异较大;数据增强方式未贴合 CIFAR100 特点,泛化能力提升有限。
  4. 训练配置不当:训练轮数仅 5 轮,模型未充分收敛;使用固定学习率和 SGD 优化器,多层微调时收敛速度慢,难以适配新的特征分布。
  5. Web 端适配缺失:若 Web 端未同步训练阶段的结构修改和预处理参数,即使训练效果提升,也会出现识别准确率偏低的问题。

三、全流程优化方案说明

(一)模型结构优化

  1. 重构输入层:将 ResNet18 的第一层 7x7 卷积替换为 3x3 卷积(步长 1、padding1),减少小尺寸图像的细节丢失;同时移除第一层池化层,避免特征图过度压缩。
  2. 调整输出层:将原适配 ImageNet 的 1000 类全连接层,修改为适配 CIFAR100 的 100 类全连接层,确保分类头与任务匹配。

(二)微调策略优化

  1. 分层解冻训练:先冻结所有层参数,再解冻后三层卷积(layer2、layer3、layer4)与分类头,既保留预训练的通用特征,又让关键特征层适配 CIFAR100 数据分布。
  2. 优化器选择:替换原 SGD 优化器为 AdamW,其权重衰减机制更适合多层微调,能有效防止过拟合,提升收敛速度。
  3. 学习率调度:采用余弦退火学习率调度器(CosineAnnealingLR),根据训练轮数平滑衰减学习率,避免后期梯度震荡,帮助模型收敛到更优解。

(三)数据预处理优化

  1. 尺寸适配:恢复 CIFAR100 原生 32x32 尺寸,不再强制缩放至 224x224,最大程度保留图像细节。
  2. 标准化参数更新:使用 CIFAR100 官方统计的均值([0.5071, 0.4867, 0.4408])和标准差([0.2675, 0.2565, 0.2761]),让数据分布更贴合模型训练需求。
  3. 针对性数据增强:训练集添加随机裁剪(32x32+4 像素 padding)和随机水平翻转,提升模型泛化能力;测试集仅保留标准化处理,确保评估准确性。

(四)训练配置优化

  1. 调整训练轮数:将训练轮数从 5 轮增加至 20 轮,给予模型充足的收敛时间,让解冻的特征层和分类头充分适配 CIFAR100。
  2. 优化批次大小:将批次大小从 128 调整为 64,适配多层微调的显存需求,避免 GPU 显存不足的问题,同时保证训练稳定性。
  3. 权重衰减调整:将权重衰减系数从 1e-5 调整为 1e-4,增强对过拟合的抑制效果,尤其适配多层训练场景。

(五)Web 页面同步优化

  1. 模型结构同步:Web 端加载模型时,需复刻优化后的模型结构(3x3 输入卷积、移除池化层、100 类分类头),确保与训练权重匹配。
  2. 预处理参数同步:将 Web 端的图像预处理调整为 32x32 尺寸缩放,使用 CIFAR100 的标准化参数,与训练 / 测试阶段保持一致。
  3. 错误处理强化:补充模型结构不匹配、预处理参数不一致等场景的错误提示,帮助快速排查问题。

四、优化效果与核心价值

  1. 准确率大幅提升:测试集准确率从初始的 9.43% 提升至 70%+,达到 CIFAR100 分类任务的实用水平。
  2. 模型适配性增强:优化后的模型充分适配 CIFAR100 的小尺寸、多类别特点,特征提取和分类能力显著提升。
  3. Web 工具实用化:同步优化后的 Web 可视化工具,识别效果与训练评估一致,支持多场景图像输入,错误处理完善,可直接用于日常识别需求。
  4. 可复用性强:优化思路可迁移至其他小尺寸数据集(如 CIFAR10)与预训练模型的结合场景,为迁移学习实践提供参考。

五、关键注意事项

  1. 训练环境:GPU 训练可大幅缩短时间(30-40 分钟),CPU 训练需 2-3 小时,建议根据硬件条件调整批次大小。
  2. 数据一致性:从训练到 Web 端,图像预处理的尺寸、标准化参数、图像格式转换必须完全一致,否则会导致准确率下降。
  3. 权重文件匹配:Web 端需加载优化后训练生成的新权重文件,避免与初始版本权重混用。
  4. 过拟合防控:若训练过程中出现训练准确率远高于测试准确率,可适当增加数据增强手段(如随机旋转)或提高权重衰减系数。

效果展示

附录

代码说明

环境是 PyCharm + Python 3.13,本地无权重和数据集。

注意事项:

  1. UserWarning: The parameter 'pretrained' is deprecated since 0.13 and may be removed in the future, please use 'weights' instead.这个可改可不改。
  2. Web页面URL最好把0.0.0.0改成localhost,访问http://localhost:7860即可。

核心问题分析

  1. 微调策略过于保守:仅训练最后一层全连接层,ResNet18 的特征提取层(卷积层)是为 ImageNet 训练的,与 CIFAR100 的低分辨率(32x32)、类别分布差异大,通用特征无法适配 CIFAR100,导致分类效果极差。
  2. 图像预处理适配不足:CIFAR100 原生是 32x32 图像,直接缩放至 224x224 会丢失大量细节,且仅用 ImageNet 的标准化参数未针对 CIFAR100 优化。
  3. 训练配置不合理:学习率、轮数、优化器配置未适配 “解冻多层微调” 的场景,导致模型无法有效收敛。

核心优化点说明

优化项原问题修正方案
模型结构ResNet18 原生 7x7 卷积 + 池化,32x32 图像缩放至 224x224 丢失细节1. 替换输入层为 3x3 卷积(步长 1、padding1)

2. 移除第一层池化

3. 恢复 CIFAR100 原生 32x32 尺寸
微调策略仅训练最后一层,特征层未适配 CIFAR100解冻 layer2+layer3+layer4(后三层卷积)+ 分类头,让特征层适配 CIFAR100
数据预处理使用 ImageNet 均值 /std,增强方式不贴合 CIFAR1001. 使用 CIFAR100 官方均值 /std

2. 增加 CIFAR100 专用增强(随机裁剪 + padding)
训练配置轮数少、学习率固定、SGD 优化器收敛慢1. 训练轮数增至 20 轮

2. 使用 AdamW 优化器(更适合多层微调)

3. 余弦退火学习率调度器(平滑衰减)

最终版代码

预训练微调模型

  1
  2
  3
  4
  5
  6
  7
  8
  9
 10
 11
 12
 13
 14
 15
 16
 17
 18
 19
 20
 21
 22
 23
 24
 25
 26
 27
 28
 29
 30
 31
 32
 33
 34
 35
 36
 37
 38
 39
 40
 41
 42
 43
 44
 45
 46
 47
 48
 49
 50
 51
 52
 53
 54
 55
 56
 57
 58
 59
 60
 61
 62
 63
 64
 65
 66
 67
 68
 69
 70
 71
 72
 73
 74
 75
 76
 77
 78
 79
 80
 81
 82
 83
 84
 85
 86
 87
 88
 89
 90
 91
 92
 93
 94
 95
 96
 97
 98
 99
100
101
102
103
104
105
106
107
108
109
110
111
112
113
114
115
116
117
118
119
120
121
122
123
124
125
126
127
128
129
130
131
132
133
134
135
136
137
138
139
140
141
142
143
144
145
146
147
148
149
150
151
152
153
154
155
156
157
158
159
160
161
162
163
164
165
166
167
168
169
170
171
172
173
174
175
176
177
178
179
180
181
182
183
184
185
186
187
188
189
190
191
192
193
194
195
196
197
198
199
200
201
202
203
204
205
206
207
208
209
210
211
212
213
214
215
216
217
218
219
220
221
222
223
224
225
226
227
228
229
230
231
232
233
234
235
236
237
238
239
240
241
242
243
244
245
246
247
248
249
250
251
252
253
254
255
256
257
258
259
260
261
262
263
264
265
266
267
268
269
import torch
import torch.nn as nn
import torch.optim as optim
from torch.utils.data import DataLoader
from torchvision import datasets, transforms, models
import matplotlib.pyplot as plt
import time
import os

# ====================== 1. 全局配置(优化适配CIFAR100) ======================
DEVICE = torch.device("cuda" if torch.cuda.is_available() else "cpu")
print(f"使用设备: {DEVICE}")

# 训练参数(针对CIFAR100优化)
BATCH_SIZE = 64          # 降低批次大小,适配多层微调的显存需求
EPOCHS = 20              # 增加训练轮数,让模型充分收敛
INIT_LR = 5e-4           # 初始学习率(略高,配合调度器衰减)
WEIGHT_DECAY = 1e-4      # 调整权重衰减,平衡过拟合
MOMENTUM = 0.9

# 数据配置(优化预处理)
DATA_ROOT = "./data/cifar100"
NUM_CLASSES = 100
IMAGE_SIZE = 32          # 恢复CIFAR100原生尺寸,避免缩放丢失细节

# 输出配置
SAVE_MODEL_PATH = "./resnet18_cifar100_finetuned_v2.pth"
PLOT_PATH = "./training_curve_v2.png"

# ====================== 2. 数据预处理与加载(针对CIFAR100优化) ======================
def get_cifar100_dataloaders():
    """
    优化CIFAR100预处理:适配32x32尺寸,增加针对性数据增强,使用CIFAR100均值/std
    """
    # CIFAR100官方统计的均值和标准差(比ImageNet参数更适配)
    cifar100_mean = [0.5071, 0.4867, 0.4408]
    cifar100_std = [0.2675, 0.2565, 0.2761]

    # 训练集预处理:增强更贴合CIFAR100
    train_transform = transforms.Compose([
        transforms.RandomCrop(32, padding=4),  # 随机裁剪(CIFAR100常用增强)
        transforms.RandomHorizontalFlip(),
        transforms.ToTensor(),
        transforms.Normalize(mean=cifar100_mean, std=cifar100_std)
    ])

    # 测试集预处理:仅标准化
    test_transform = transforms.Compose([
        transforms.ToTensor(),
        transforms.Normalize(mean=cifar100_mean, std=cifar100_std)
    ])

    # 加载数据集
    train_dataset = datasets.CIFAR100(
        root=DATA_ROOT, train=True, download=True, transform=train_transform
    )
    test_dataset = datasets.CIFAR100(
        root=DATA_ROOT, train=False, download=True, transform=test_transform
    )

    # 数据加载器
    train_loader = DataLoader(
        train_dataset, batch_size=BATCH_SIZE, shuffle=True, num_workers=0
    )
    test_loader = DataLoader(
        test_dataset, batch_size=BATCH_SIZE, shuffle=False, num_workers=0
    )

    print(f"✅ CIFAR100数据集加载完成")
    print(f"   训练集样本数: {len(train_dataset)}")
    print(f"   测试集样本数: {len(test_dataset)}")
    return train_loader, test_loader

# ====================== 3. 模型构建(重构ResNet18适配CIFAR100,优化微调策略) ======================
def build_resnet18_cifar100_model():
    """
    1. 重构ResNet18输入层:适配CIFAR100的32x32图像(原ResNet18输入层适配224x224)
    2. 微调策略:解冻后三层卷积+分类头,兼顾特征适配和训练效率
    """
    # 加载预训练ResNet18
    model = models.resnet18(pretrained=True)

    # 关键修改1:替换第一层卷积,适配32x32小尺寸(原conv1是7x7步长2,会丢失太多细节)
    # 改为3x3卷积、步长1、padding1,保留更多CIFAR100细节
    model.conv1 = nn.Conv2d(3, 64, kernel_size=3, stride=1, padding=1, bias=False)
    # 关键修改2:移除第一层池化(32x32经7x7卷积+池化后只剩8x8,3x3卷积无需池化)
    model.maxpool = nn.Identity()

    # 微调策略2:解冻后三层卷积 + 分类头(layer2+layer3+layer4 + fc)
    # 先冻结所有层
    for param in model.parameters():
        param.requires_grad = False

    # 解冻layer2、layer3、layer4(特征提取层后三层)
    for param in model.layer2.parameters():
        param.requires_grad = True
    for param in model.layer3.parameters():
        param.requires_grad = True
    for param in model.layer4.parameters():
        param.requires_grad = True

    # 修改最后一层全连接层(适配100类)
    in_features = model.fc.in_features
    model.fc = nn.Linear(in_features, NUM_CLASSES)
    # 解冻分类头
    for param in model.fc.parameters():
        param.requires_grad = True

    # 移至设备
    model = model.to(DEVICE)
    print(f"✅ ResNet18模型重构完成")
    print(f"   输入层适配32x32图像,解冻layer2-layer4+fc进行微调")
    return model

# ====================== 4. 训练/测试函数(优化训练策略) ======================
def train_model(model, train_loader, criterion, optimizer, scheduler):
    """优化训练流程:增加详细统计,适配多层微调"""
    model.train()
    running_loss = 0.0
    correct = 0
    total = 0

    for batch_idx, (images, labels) in enumerate(train_loader):
        images, labels = images.to(DEVICE), labels.to(DEVICE)

        # 前向+反向+优化
        optimizer.zero_grad()
        outputs = model(images)
        loss = criterion(outputs, labels)
        loss.backward()
        optimizer.step()

        # 统计
        running_loss += loss.item()
        _, predicted = torch.max(outputs.data, 1)
        total += labels.size(0)
        correct += (predicted == labels).sum().item()

        # 每50批次打印
        if (batch_idx + 1) % 50 == 0:
            batch_loss = running_loss / 50
            batch_acc = 100 * correct / total
            print(f"   Batch [{batch_idx+1}/{len(train_loader)}], Loss: {batch_loss:.4f}, Acc: {batch_acc:.2f}%")
            running_loss = 0.0
            correct = 0
            total = 0

    # 学习率调度
    scheduler.step()
    # 计算本轮整体指标
    epoch_loss = running_loss / (len(train_loader) % 50 if len(train_loader) % 50 != 0 else 50)
    epoch_acc = 100 * correct / total if total > 0 else 0
    return epoch_loss, epoch_acc

def test_model(model, test_loader, criterion):
    """保持测试逻辑不变,确保评估准确"""
    model.eval()
    running_loss = 0.0
    correct = 0
    total = 0

    with torch.no_grad():
        for images, labels in test_loader:
            images, labels = images.to(DEVICE), labels.to(DEVICE)
            outputs = model(images)
            loss = criterion(outputs, labels)

            running_loss += loss.item()
            _, predicted = torch.max(outputs.data, 1)
            total += labels.size(0)
            correct += (predicted == labels).sum().item()

    test_loss = running_loss / len(test_loader)
    test_acc = 100 * correct / total
    print(f"✅ Test Loss: {test_loss:.4f}, Test Acc: {test_acc:.2f}%")
    return test_loss, test_acc

# ====================== 5. 绘图函数(不变) ======================
def plot_training_curve(train_losses, train_accs, test_losses, test_accs):
    plt.figure(figsize=(12, 4))
    # 损失曲线
    plt.subplot(1, 2, 1)
    plt.plot(train_losses, label='Train Loss')
    plt.plot(test_losses, label='Test Loss')
    plt.title('Training and Test Loss')
    plt.xlabel('Epoch')
    plt.ylabel('Loss')
    plt.legend()
    plt.grid(True)
    # 准确率曲线
    plt.subplot(1, 2, 2)
    plt.plot(train_accs, label='Train Acc')
    plt.plot(test_accs, label='Test Acc')
    plt.title('Training and Test Accuracy')
    plt.xlabel('Epoch')
    plt.ylabel('Accuracy (%)')
    plt.legend()
    plt.grid(True)
    # 保存
    plt.tight_layout()
    plt.savefig(PLOT_PATH)
    plt.close()
    print(f"✅ 训练曲线已保存至: {PLOT_PATH}")

# ====================== 6. 主流程(优化优化器和学习率调度) ======================
def main():
    # 加载数据
    train_loader, test_loader = get_cifar100_dataloaders()
    # 构建模型
    model = build_resnet18_cifar100_model()

    # 损失函数
    criterion = nn.CrossEntropyLoss().to(DEVICE)
    # 优化器:使用AdamW(比SGD更适合多层微调),仅优化解冻参数
    optimizer = optim.AdamW(
        filter(lambda p: p.requires_grad, model.parameters()),
        lr=INIT_LR,
        weight_decay=WEIGHT_DECAY
    )
    # 学习率调度器:余弦退火,更平滑的衰减,适配20轮训练
    scheduler = optim.lr_scheduler.CosineAnnealingLR(optimizer, T_max=EPOCHS)

    # 训练记录
    train_losses = []
    train_accs = []
    test_losses = []
    test_accs = []
    start_time = time.time()

    # 开始训练
    print("\n========== 开始微调ResNet18(适配CIFAR100) ==========")
    for epoch in range(EPOCHS):
        print(f"\nEpoch [{epoch+1}/{EPOCHS}] | 当前学习率: {optimizer.param_groups[0]['lr']:.6f}")
        # 训练
        train_loss, train_acc = train_model(model, train_loader, criterion, optimizer, scheduler)
        # 测试
        test_loss, test_acc = test_model(model, test_loader, criterion)
        # 记录
        train_losses.append(train_loss)
        train_accs.append(train_acc)
        test_losses.append(test_loss)
        test_accs.append(test_acc)

    # 训练总结
    total_time = time.time() - start_time
    print(f"\n========== 微调完成 ==========")
    print(f"总训练时间: {total_time/60:.2f} 分钟")
    print(f"最终测试准确率: {test_accs[-1]:.2f}%")

    # 保存模型
    torch.save(model.state_dict(), SAVE_MODEL_PATH)
    print(f"✅ 微调后模型已保存至: {SAVE_MODEL_PATH}")

    # 绘制曲线
    plot_training_curve(train_losses, train_accs, test_losses, test_accs)

    # 验证保存的模型
    print("\n========== 验证保存的模型 ==========")
    # 重新构建模型(确保加载权重的结构一致)
    saved_model = build_resnet18_cifar100_model()
    saved_model.load_state_dict(torch.load(SAVE_MODEL_PATH, map_location=DEVICE))
    test_model(saved_model, test_loader, criterion)

if __name__ == "__main__":
    # 创建目录
    os.makedirs(os.path.dirname(SAVE_MODEL_PATH), exist_ok=True)
    os.makedirs(DATA_ROOT, exist_ok=True)
    # 执行
    main()

Gradio 识别代码

  1
  2
  3
  4
  5
  6
  7
  8
  9
 10
 11
 12
 13
 14
 15
 16
 17
 18
 19
 20
 21
 22
 23
 24
 25
 26
 27
 28
 29
 30
 31
 32
 33
 34
 35
 36
 37
 38
 39
 40
 41
 42
 43
 44
 45
 46
 47
 48
 49
 50
 51
 52
 53
 54
 55
 56
 57
 58
 59
 60
 61
 62
 63
 64
 65
 66
 67
 68
 69
 70
 71
 72
 73
 74
 75
 76
 77
 78
 79
 80
 81
 82
 83
 84
 85
 86
 87
 88
 89
 90
 91
 92
 93
 94
 95
 96
 97
 98
 99
100
101
102
103
104
105
106
107
108
109
110
111
112
113
114
115
116
117
118
119
120
121
122
123
124
125
126
127
128
129
130
131
132
133
134
135
136
137
138
139
140
141
142
143
144
145
146
147
148
149
import torch
import torch.nn as nn
from torchvision import transforms, models
import gradio as gr
import numpy as np
import os

# ====================== 1. 全局配置(与修正后的训练代码一致) ======================
DEVICE = torch.device("cuda" if torch.cuda.is_available() else "cpu")
MODEL_PATH = "./resnet18_cifar100_finetuned_v2.pth"
IMAGE_SIZE = 32  # 适配CIFAR100原生尺寸
CIFAR100_CLASSES = [
    'apple', 'aquarium_fish', 'baby', 'bear', 'beaver', 'bed', 'bee', 'beetle',
    'bicycle', 'bottle', 'bowl', 'boy', 'bridge', 'bus', 'butterfly', 'camel',
    'can', 'castle', 'caterpillar', 'cattle', 'chair', 'chimpanzee', 'clock',
    'cloud', 'cockroach', 'couch', 'crab', 'crocodile', 'cup', 'dinosaur',
    'dolphin', 'elephant', 'flatfish', 'forest', 'fox', 'girl', 'hamster',
    'house', 'kangaroo', 'keyboard', 'lamp', 'lawn_mower', 'leopard', 'lion',
    'lizard', 'lobster', 'man', 'maple_tree', 'motorcycle', 'mountain', 'mouse',
    'mushroom', 'oak_tree', 'orange', 'orchid', 'otter', 'palm_tree', 'pear',
    'pickup_truck', 'pine_tree', 'plain', 'plate', 'poppy', 'porcupine',
    'possum', 'rabbit', 'raccoon', 'ray', 'road', 'rocket', 'rose',
    'sea', 'seal', 'shark', 'shrew', 'skunk', 'skyscraper', 'snail', 'snake',
    'spider', 'squirrel', 'streetcar', 'sunflower', 'sweet_pepper', 'table',
    'tank', 'telephone', 'television', 'tiger', 'tractor', 'train', 'trout',
    'tulip', 'turtle', 'wardrobe', 'whale', 'willow_tree', 'wolf', 'woman',
    'worm'
]
# CIFAR100标准化参数(与训练一致)
cifar100_mean = [0.5071, 0.4867, 0.4408]
cifar100_std = [0.2675, 0.2565, 0.2761]


# ====================== 2. 加载修正后的模型 ======================
def load_resnet18_cifar100_model():
    try:
        # 重构与训练一致的模型结构
        model = models.resnet18(pretrained=False)
        # 替换输入层
        model.conv1 = nn.Conv2d(3, 64, kernel_size=3, stride=1, padding=1, bias=False)
        model.maxpool = nn.Identity()
        # 修改分类头
        in_features = model.fc.in_features
        model.fc = nn.Linear(in_features, 100)

        # 加载权重
        checkpoint = torch.load(MODEL_PATH, map_location=DEVICE)
        model.load_state_dict(checkpoint)
        model = model.to(DEVICE)
        model.eval()

        print(f"✅ 模型加载成功,运行设备:{DEVICE}")
        return model
    except FileNotFoundError:
        raise Exception(f"❌ 权重文件未找到:{MODEL_PATH}\n请先运行修正后的训练代码")
    except RuntimeError as e:
        raise Exception(f"❌ 权重加载失败:{str(e)}")
    except Exception as e:
        raise Exception(f"❌ 模型加载错误:{str(e)}")


# 初始化模型
try:
    MODEL = load_resnet18_cifar100_model()
except Exception as e:
    print(f"模型初始化失败:{e}")
    MODEL = None

# ====================== 3. 图像预处理(适配CIFAR100) ======================
image_transform = transforms.Compose([
    transforms.Resize((IMAGE_SIZE, IMAGE_SIZE)),  # 缩放到32x32
    transforms.ToTensor(),
    transforms.Normalize(mean=cifar100_mean, std=cifar100_std)
])


def predict_cifar100(image):
    if MODEL is None:
        return "⚠️ 模型加载失败!", {cls: 0.0 for cls in CIFAR100_CLASSES[:5]}
    if image is None:
        return "⚠️ 请上传图像!", {cls: 0.0 for cls in CIFAR100_CLASSES[:5]}

    try:
        # 转为RGB
        if image.mode != 'RGB':
            image = image.convert('RGB')
        # 预处理
        processed_image = image_transform(image).unsqueeze(0).to(DEVICE)

        # 推理
        with torch.no_grad():
            outputs = MODEL(processed_image)
            probabilities = torch.softmax(outputs, dim=1).squeeze(0).cpu().numpy()

        # 结果整理
        pred_idx = np.argmax(probabilities)
        pred_class = CIFAR100_CLASSES[pred_idx]
        pred_confidence = round(probabilities[pred_idx] * 100, 2)

        # Top5置信度
        top5_indices = np.argsort(probabilities)[-5:][::-1]
        top5_dict = {
            CIFAR100_CLASSES[idx]: round(probabilities[idx] * 100, 2)
            for idx in top5_indices
        }

        result_text = f"🎯 预测结果:{pred_class}\n📊 置信度:{pred_confidence}%"
        return result_text, top5_dict

    except Exception as e:
        error_msg = f"⚠️ 图像处理失败:{str(e)}"
        return error_msg, {cls: 0.0 for cls in CIFAR100_CLASSES[:5]}


# ====================== 4. Gradio界面(不变) ======================
def build_gradio_interface():
    with gr.Blocks(title="CIFAR100图像分类工具(ResNet18优化版)") as demo:
        gr.Markdown("# 🖼️ CIFAR100图像分类工具(优化版)")

        with gr.Row():
            with gr.Column(scale=1):
                image_input = gr.Image(
                    type="pil", label="上传待识别图像", height=300,
                    sources=["upload", "clipboard", "webcam"]
                )
                submit_btn = gr.Button("开始识别", variant="primary", size="lg")

            with gr.Column(scale=1):
                result_text = gr.Textbox(
                    label="识别结果", placeholder="识别结果将显示在这里...", lines=3
                )
                confidence_plot = gr.Label(label="Top5类别置信度分布", num_top_classes=5)

        # 绑定事件
        submit_btn.click(predict_cifar100, inputs=image_input, outputs=[result_text, confidence_plot])
        image_input.change(predict_cifar100, inputs=image_input, outputs=[result_text, confidence_plot])

        # 说明
        gr.Markdown(
            "### 📌 优化版说明\n1. 适配CIFAR100 32x32尺寸,识别准确率大幅提升\n2. 支持100类物体识别,建议上传清晰的物体图像")

    # 启动
    demo.launch(server_name="localhost", server_port=7860, share=False)


if __name__ == "__main__":
    if not os.path.exists(MODEL_PATH) and MODEL is None:
        print(f"⚠️ 未找到权重文件 {MODEL_PATH},请先运行修正后的训练代码!")
    build_gradio_interface()

初版代码

预训练微调模型

  1
  2
  3
  4
  5
  6
  7
  8
  9
 10
 11
 12
 13
 14
 15
 16
 17
 18
 19
 20
 21
 22
 23
 24
 25
 26
 27
 28
 29
 30
 31
 32
 33
 34
 35
 36
 37
 38
 39
 40
 41
 42
 43
 44
 45
 46
 47
 48
 49
 50
 51
 52
 53
 54
 55
 56
 57
 58
 59
 60
 61
 62
 63
 64
 65
 66
 67
 68
 69
 70
 71
 72
 73
 74
 75
 76
 77
 78
 79
 80
 81
 82
 83
 84
 85
 86
 87
 88
 89
 90
 91
 92
 93
 94
 95
 96
 97
 98
 99
100
101
102
103
104
105
106
107
108
109
110
111
112
113
114
115
116
117
118
119
120
121
122
123
124
125
126
127
128
129
130
131
132
133
134
135
136
137
138
139
140
141
142
143
144
145
146
147
148
149
150
151
152
153
154
155
156
157
158
159
160
161
162
163
164
165
166
167
168
169
170
171
172
173
174
175
176
177
178
179
180
181
182
183
184
185
186
187
188
189
190
191
192
193
194
195
196
197
198
199
200
201
202
203
204
205
206
207
208
209
210
211
212
213
214
215
216
217
218
219
220
221
222
223
224
225
226
227
228
229
230
231
232
233
234
235
236
237
238
239
240
241
242
243
244
245
246
247
248
249
250
251
252
253
254
255
256
257
258
259
260
261
262
263
264
265
266
267
268
269
270
271
272
273
274
275
276
277
278
279
280
281
282
283
284
285
286
287
288
289
290
291
292
293
294
295
296
297
298
299
300
301
302
303
304
import torch
import torch.nn as nn
import torch.optim as optim
from torch.utils.data import DataLoader
from torchvision import datasets, transforms, models
import matplotlib.pyplot as plt
import time
import os

# ====================== 1. 全局配置(易于维护和修改) ======================
# 设备配置:优先使用GPU,无则CPU
DEVICE = torch.device("cuda" if torch.cuda.is_available() else "cpu")
print(f"使用设备: {DEVICE}")

# 训练参数
BATCH_SIZE = 128  # 批次大小(根据GPU显存调整,CPU建议64)
EPOCHS = 10  # 微调轮数(ResNet18预训练后无需太多轮数)
LEARNING_RATE = 1e-4  # 微调学习率(预训练模型学习率要小)
WEIGHT_DECAY = 1e-5  # 权重衰减,防止过拟合
MOMENTUM = 0.9  # SGD动量

# 数据配置
DATA_ROOT = "./data/cifar100"  # 数据集保存路径
NUM_CLASSES = 100  # CIFAR100类别数
IMAGE_SIZE = 224  # ResNet18输入尺寸(原ResNet适配224x224)

# 输出配置
SAVE_MODEL_PATH = "./resnet18_cifar100_finetuned.pth"  # 微调后权重保存路径
PLOT_PATH = "./training_curve.png"  # 训练曲线保存路径


# ====================== 2. 数据预处理与加载(自动下载CIFAR100) ======================
def get_cifar100_dataloaders():
    """
    加载CIFAR100数据集,自动下载并完成预处理,返回训练/测试数据加载器
    """
    # 训练集预处理:数据增强 + 标准化
    train_transform = transforms.Compose([
        transforms.RandomResizedCrop(IMAGE_SIZE),  # 随机裁剪并缩放到224x224
        transforms.RandomHorizontalFlip(),  # 随机水平翻转(数据增强)
        transforms.ToTensor(),  # 转为Tensor,归一化到[0,1]
        # ImageNet预训练模型的标准化参数(ResNet18基于ImageNet训练)
        transforms.Normalize(mean=[0.485, 0.456, 0.406],
                             std=[0.229, 0.224, 0.225])
    ])

    # 测试集预处理:仅标准化和缩放,无数据增强
    test_transform = transforms.Compose([
        transforms.Resize((IMAGE_SIZE, IMAGE_SIZE)),  # 缩放到224x224
        transforms.ToTensor(),
        transforms.Normalize(mean=[0.485, 0.456, 0.406],
                             std=[0.229, 0.224, 0.225])
    ])

    # 加载训练集(自动下载)
    train_dataset = datasets.CIFAR100(
        root=DATA_ROOT,
        train=True,
        download=True,
        transform=train_transform
    )

    # 加载测试集(自动下载)
    test_dataset = datasets.CIFAR100(
        root=DATA_ROOT,
        train=False,
        download=True,
        transform=test_transform
    )

    # 构建数据加载器
    train_loader = DataLoader(
        train_dataset,
        batch_size=BATCH_SIZE,
        shuffle=True,  # 训练集打乱
        num_workers=0  # Windows系统建议设为0,避免多进程报错;Linux/Mac可设为4/8
    )

    test_loader = DataLoader(
        test_dataset,
        batch_size=BATCH_SIZE,
        shuffle=False,  # 测试集无需打乱
        num_workers=0
    )

    print(f"✅ CIFAR100数据集加载完成")
    print(f"   训练集样本数: {len(train_dataset)}")
    print(f"   测试集样本数: {len(test_dataset)}")
    return train_loader, test_loader


# ====================== 3. 模型构建(ResNet18微调适配CIFAR100) ======================
def build_resnet18_finetune_model():
    """
    加载预训练的ResNet18,修改最后一层适配CIFAR100的100类,设置微调策略
    """
    # 加载ImageNet预训练的ResNet18(自动下载预训练权重)
    model = models.resnet18(pretrained=True)

    # 微调策略1:冻结特征提取层(前几层),仅训练分类头
    # 先冻结所有层
    for param in model.parameters():
        param.requires_grad = False

    # 修改最后一层全连接层:原ResNet18输出1000类(ImageNet)→ 改为100类(CIFAR100)
    in_features = model.fc.in_features  # 获取最后一层输入特征数
    model.fc = nn.Linear(in_features, NUM_CLASSES)

    # 解冻最后一层,仅训练分类头(也可解冻最后2-3个卷积层,微调效果更好)
    for param in model.fc.parameters():
        param.requires_grad = True

    # (可选)进阶微调:解冻最后一个卷积块,增强适配性
    # for param in model.layer4.parameters():
    #     param.requires_grad = True

    # 将模型移至指定设备
    model = model.to(DEVICE)

    print(f"✅ ResNet18模型构建完成,预训练权重已加载")
    print(f"   最后一层已修改为适配CIFAR100的{NUM_CLASSES}分类")
    return model


# ====================== 4. 训练(微调)函数 ======================
def train_model(model, train_loader, criterion, optimizer):
    """
    模型微调训练,返回训练损失和准确率
    """
    model.train()  # 切换为训练模式
    running_loss = 0.0
    correct = 0
    total = 0

    for batch_idx, (images, labels) in enumerate(train_loader):
        # 数据移至设备
        images = images.to(DEVICE)
        labels = labels.to(DEVICE)

        # 前向传播
        outputs = model(images)
        loss = criterion(outputs, labels)

        # 反向传播与优化
        optimizer.zero_grad()  # 清空梯度
        loss.backward()  # 反向传播
        optimizer.step()  # 更新参数

        # 统计损失和准确率
        running_loss += loss.item()
        _, predicted = torch.max(outputs.data, 1)
        total += labels.size(0)
        correct += (predicted == labels).sum().item()

        # 每100批次打印进度
        if (batch_idx + 1) % 100 == 0:
            batch_loss = running_loss / 100
            batch_acc = 100 * correct / total
            print(f"   Batch [{batch_idx + 1}/{len(train_loader)}], Loss: {batch_loss:.4f}, Acc: {batch_acc:.2f}%")
            running_loss = 0.0
            correct = 0
            total = 0

    # 返回本轮平均损失(简化版,可按需求调整)
    epoch_loss = running_loss / len(train_loader)
    epoch_acc = 100 * correct / total if total > 0 else 0
    return epoch_loss, epoch_acc


# ====================== 5. 测试(评估)函数 ======================
def test_model(model, test_loader, criterion):
    """
    模型测试评估,返回测试损失和准确率
    """
    model.eval()  # 切换为评估模式(禁用Dropout/BatchNorm训练行为)
    running_loss = 0.0
    correct = 0
    total = 0

    with torch.no_grad():  # 禁用梯度计算,节省内存
        for images, labels in test_loader:
            images = images.to(DEVICE)
            labels = labels.to(DEVICE)

            outputs = model(images)
            loss = criterion(outputs, labels)

            running_loss += loss.item()
            _, predicted = torch.max(outputs.data, 1)
            total += labels.size(0)
            correct += (predicted == labels).sum().item()

    # 计算整体损失和准确率
    test_loss = running_loss / len(test_loader)
    test_acc = 100 * correct / total
    print(f"✅ Test Loss: {test_loss:.4f}, Test Acc: {test_acc:.2f}%")
    return test_loss, test_acc


# ====================== 6. 训练曲线绘制 ======================
def plot_training_curve(train_losses, train_accs, test_losses, test_accs):
    """
    绘制训练/测试损失和准确率曲线,保存到指定路径
    """
    plt.figure(figsize=(12, 4))

    # 损失曲线
    plt.subplot(1, 2, 1)
    plt.plot(train_losses, label='Train Loss')
    plt.plot(test_losses, label='Test Loss')
    plt.title('Training and Test Loss')
    plt.xlabel('Epoch')
    plt.ylabel('Loss')
    plt.legend()
    plt.grid(True)

    # 准确率曲线
    plt.subplot(1, 2, 2)
    plt.plot(train_accs, label='Train Acc')
    plt.plot(test_accs, label='Test Acc')
    plt.title('Training and Test Accuracy')
    plt.xlabel('Epoch')
    plt.ylabel('Accuracy (%)')
    plt.legend()
    plt.grid(True)

    # 保存图片
    plt.tight_layout()
    plt.savefig(PLOT_PATH)
    plt.close()
    print(f"✅ 训练曲线已保存至: {PLOT_PATH}")


# ====================== 7. 主流程(整合所有步骤) ======================
def main():
    # 步骤1:加载数据
    train_loader, test_loader = get_cifar100_dataloaders()

    # 步骤2:构建模型
    model = build_resnet18_finetune_model()

    # 步骤3:定义损失函数和优化器
    # 交叉熵损失(分类任务)
    criterion = nn.CrossEntropyLoss().to(DEVICE)
    # 优化器:仅优化需要训练的参数(冻结层不会被优化)
    optimizer = optim.SGD(
        filter(lambda p: p.requires_grad, model.parameters()),
        lr=LEARNING_RATE,
        momentum=MOMENTUM,
        weight_decay=WEIGHT_DECAY
    )
    # 学习率调度器(可选):每3轮学习率减半,提升微调效果
    scheduler = optim.lr_scheduler.StepLR(optimizer, step_size=3, gamma=0.5)

    # 步骤4:开始微调训练
    print("\n========== 开始微调ResNet18 ==========")
    train_losses = []
    train_accs = []
    test_losses = []
    test_accs = []
    start_time = time.time()

    for epoch in range(EPOCHS):
        print(f"\nEpoch [{epoch + 1}/{EPOCHS}]")
        # 训练
        train_loss, train_acc = train_model(model, train_loader, criterion, optimizer)
        # 测试
        test_loss, test_acc = test_model(model, test_loader, criterion)
        # 学习率更新
        scheduler.step()

        # 记录数据
        train_losses.append(train_loss)
        train_accs.append(train_acc)
        test_losses.append(test_loss)
        test_accs.append(test_acc)

    # 计算总训练时间
    total_time = time.time() - start_time
    print(f"\n========== 微调完成 ==========")
    print(f"总训练时间: {total_time / 60:.2f} 分钟")
    print(f"最终测试准确率: {test_accs[-1]:.2f}%")

    # 步骤5:保存微调后模型
    torch.save(model.state_dict(), SAVE_MODEL_PATH)
    print(f"✅ 微调后模型已保存至: {SAVE_MODEL_PATH}")

    # 步骤6:绘制训练曲线
    plot_training_curve(train_losses, train_accs, test_losses, test_accs)

    # (可选)加载保存的模型并再次验证
    print("\n========== 验证保存的模型 ==========")
    saved_model = build_resnet18_finetune_model()
    saved_model.load_state_dict(torch.load(SAVE_MODEL_PATH, map_location=DEVICE))
    test_model(saved_model, test_loader, criterion)


if __name__ == "__main__":
    # 创建输出目录(如果不存在)
    os.makedirs(os.path.dirname(SAVE_MODEL_PATH), exist_ok=True)
    os.makedirs(DATA_ROOT, exist_ok=True)

    # 执行主流程
    main()

Gradio 识别代码

  1
  2
  3
  4
  5
  6
  7
  8
  9
 10
 11
 12
 13
 14
 15
 16
 17
 18
 19
 20
 21
 22
 23
 24
 25
 26
 27
 28
 29
 30
 31
 32
 33
 34
 35
 36
 37
 38
 39
 40
 41
 42
 43
 44
 45
 46
 47
 48
 49
 50
 51
 52
 53
 54
 55
 56
 57
 58
 59
 60
 61
 62
 63
 64
 65
 66
 67
 68
 69
 70
 71
 72
 73
 74
 75
 76
 77
 78
 79
 80
 81
 82
 83
 84
 85
 86
 87
 88
 89
 90
 91
 92
 93
 94
 95
 96
 97
 98
 99
100
101
102
103
104
105
106
107
108
109
110
111
112
113
114
115
116
117
118
119
120
121
122
123
124
125
126
127
128
129
130
131
132
133
134
135
136
137
138
139
140
141
142
143
144
145
146
147
148
149
150
151
152
153
154
155
156
157
158
159
160
161
162
163
164
165
166
167
168
169
170
171
172
173
174
175
176
177
178
179
180
181
182
183
184
185
186
187
188
189
190
191
192
193
194
195
196
197
198
199
200
201
202
203
204
205
206
207
208
209
210
211
import torch
import torch.nn as nn
from torchvision import transforms, models
import gradio as gr
import numpy as np
import os

# ====================== 1. 全局配置(与训练代码保持一致,确保兼容性) ======================
# 设备配置:优先GPU,无则CPU
DEVICE = torch.device("cuda" if torch.cuda.is_available() else "cpu")
# 模型权重路径(需与训练代码的SAVE_MODEL_PATH一致)
MODEL_PATH = "./resnet18_cifar100_finetuned.pth"
# ResNet18输入尺寸
IMAGE_SIZE = 224
# CIFAR100类别名称(官方标准类别名)
CIFAR100_CLASSES = [
    'apple', 'aquarium_fish', 'baby', 'bear', 'beaver', 'bed', 'bee', 'beetle',
    'bicycle', 'bottle', 'bowl', 'boy', 'bridge', 'bus', 'butterfly', 'camel',
    'can', 'castle', 'caterpillar', 'cattle', 'chair', 'chimpanzee', 'clock',
    'cloud', 'cockroach', 'couch', 'crab', 'crocodile', 'cup', 'dinosaur',
    'dolphin', 'elephant', 'flatfish', 'forest', 'fox', 'girl', 'hamster',
    'house', 'kangaroo', 'keyboard', 'lamp', 'lawn_mower', 'leopard', 'lion',
    'lizard', 'lobster', 'man', 'maple_tree', 'motorcycle', 'mountain', 'mouse',
    'mushroom', 'oak_tree', 'orange', 'orchid', 'otter', 'palm_tree', 'pear',
    'pickup_truck', 'pine_tree', 'plain', 'plate', 'poppy', 'porcupine',
    'possum', 'rabbit', 'raccoon', 'ray', 'road', 'rocket', 'rose',
    'sea', 'seal', 'shark', 'shrew', 'skunk', 'skyscraper', 'snail', 'snake',
    'spider', 'squirrel', 'streetcar', 'sunflower', 'sweet_pepper', 'table',
    'tank', 'telephone', 'television', 'tiger', 'tractor', 'train', 'trout',
    'tulip', 'turtle', 'wardrobe', 'whale', 'willow_tree', 'wolf', 'woman',
    'worm'
]
# 图像标准化参数(与训练时一致,ImageNet预训练参数)
NORMALIZE_MEAN = [0.485, 0.456, 0.406]
NORMALIZE_STD = [0.229, 0.224, 0.225]


# ====================== 2. 加载模型(包含完整错误处理) ======================
def load_resnet18_cifar100_model():
    """
    加载微调后的ResNet18模型,返回初始化完成的模型
    包含权重文件缺失、模型结构不匹配等错误处理
    """
    try:
        # 1. 构建与训练时一致的模型结构
        model = models.resnet18(pretrained=False)  # 不加载ImageNet预训练权重
        # 修改最后一层适配CIFAR100的100类
        in_features = model.fc.in_features
        model.fc = nn.Linear(in_features, 100)

        # 2. 加载本地微调权重
        checkpoint = torch.load(MODEL_PATH, map_location=DEVICE)
        model.load_state_dict(checkpoint)

        # 3. 切换为评估模式
        model = model.to(DEVICE)
        model.eval()

        print(f"✅ 模型加载成功,运行设备:{DEVICE}")
        return model
    except FileNotFoundError:
        raise Exception(f"❌ 权重文件未找到,请检查路径:{MODEL_PATH}\n请先运行ResNet18微调训练代码生成权重文件")
    except RuntimeError as e:
        raise Exception(f"❌ 模型权重加载失败(结构不匹配):{str(e)}\n请确保权重文件与模型结构一致")
    except Exception as e:
        raise Exception(f"❌ 模型加载未知错误:{str(e)}")


# 初始化模型(程序启动时加载,避免每次预测重复加载)
try:
    MODEL = load_resnet18_cifar100_model()
except Exception as e:
    print(f"模型初始化失败:{e}")
    MODEL = None

# ====================== 3. 图像预处理与预测函数(核心业务逻辑) ======================
# 定义图像预处理管道(与测试集预处理一致)
image_transform = transforms.Compose([
    transforms.Resize((IMAGE_SIZE, IMAGE_SIZE)),
    transforms.ToTensor(),
    transforms.Normalize(mean=NORMALIZE_MEAN, std=NORMALIZE_STD)
])


def predict_cifar100(image):
    """
    处理上传图像并预测CIFAR100类别
    :param image: Gradio上传的图像(PIL.Image格式)
    :return: 预测结果文本、置信度分布字典
    """
    # 错误处理1:模型未加载成功
    if MODEL is None:
        return "⚠️ 模型加载失败,无法进行预测,请检查权重文件!", {cls: 0.0 for cls in CIFAR100_CLASSES[:5]}

    # 错误处理2:无图像输入
    if image is None:
        return "⚠️ 请上传一张图像后再进行识别!", {cls: 0.0 for cls in CIFAR100_CLASSES[:5]}

    try:
        # 步骤1:图像预处理
        # 确保图像为RGB格式(处理灰度图/单通道图)
        if image.mode != 'RGB':
            image = image.convert('RGB')
        # 应用预处理
        processed_image = image_transform(image).unsqueeze(0)  # 增加batch维度 [1,3,224,224]
        processed_image = processed_image.to(DEVICE)

        # 步骤2:模型推理(禁用梯度计算)
        with torch.no_grad():
            outputs = MODEL(processed_image)
            # 计算各类别置信度(softmax转换为概率)
            probabilities = torch.softmax(outputs, dim=1).squeeze(0).cpu().numpy()

        # 步骤3:整理预测结果
        # 获取置信度最高的类别索引
        pred_idx = np.argmax(probabilities)
        pred_class = CIFAR100_CLASSES[pred_idx]
        pred_confidence = round(probabilities[pred_idx] * 100, 2)

        # 构建置信度字典(仅返回前5个高置信度类别,便于可视化)
        top5_indices = np.argsort(probabilities)[-5:][::-1]  # 前5名索引(降序)
        top5_dict = {
            CIFAR100_CLASSES[idx]: round(probabilities[idx] * 100, 2)
            for idx in top5_indices
        }

        # 返回最终结果
        result_text = f"🎯 预测结果:{pred_class}\n📊 置信度:{pred_confidence}%"
        return result_text, top5_dict

    except Exception as e:
        # 处理各类图像异常(格式错误、损坏、尺寸异常等)
        error_msg = f"⚠️ 图像处理失败:{str(e)}\n请上传有效的图片文件(如JPG/PNG等),且确保图像未损坏"
        return error_msg, {cls: 0.0 for cls in CIFAR100_CLASSES[:5]}


# ====================== 4. Gradio Web界面搭建 ======================
def build_gradio_interface():
    """
    构建Gradio Web界面,包含输入、输出、说明等组件
    """
    # 定义界面组件
    with gr.Blocks(title="CIFAR100图像分类工具(ResNet18)") as demo:
        # 页面标题
        gr.Markdown("""
        # 🖼️ CIFAR100图像分类工具
        基于ResNet18微调实现的CIFAR100图像分类,支持100类物体识别
        """)

        # 布局:输入区 + 输出区
        with gr.Row():
            # 左侧:输入区
            with gr.Column(scale=1):
                image_input = gr.Image(
                    type="pil",
                    label="上传待识别图像",
                    height=300,
                    sources=["upload", "clipboard", "webcam"]  # 支持上传、剪贴板、摄像头
                )
                submit_btn = gr.Button("开始识别", variant="primary", size="lg")

            # 右侧:输出区
            with gr.Column(scale=1):
                result_text = gr.Textbox(
                    label="识别结果",
                    placeholder="识别结果将显示在这里...",
                    lines=3,
                    interactive=False
                )
                confidence_plot = gr.Label(
                    label="Top5类别置信度分布",
                    num_top_classes=5
                )

        # 绑定事件:按钮点击/图像上传自动触发识别
        def run_prediction(img):
            return predict_cifar100(img)

        submit_btn.click(fn=run_prediction, inputs=image_input, outputs=[result_text, confidence_plot])
        image_input.change(fn=run_prediction, inputs=image_input, outputs=[result_text, confidence_plot])

        # 页面说明
        gr.Markdown("""
        ### 📌 使用说明
        1. 支持上传JPG/PNG等格式图像,或通过摄像头拍摄
        2. 工具可识别CIFAR100的100类物体(如苹果、猫、汽车、树木等)
        3. 输出结果包含预测类别、置信度,以及Top5高置信度类别分布
        4. 建议上传清晰的物体图像,识别效果更佳

        ### ❗ 常见问题
        - 若提示模型加载失败:请先运行ResNet18微调训练代码生成权重文件
        - 若提示图像处理失败:请检查图像是否损坏,或格式是否正确
        """)

    # 启动Web服务
    demo.launch(
        server_name="localhost",  # 允许局域网访问
        server_port=7860,  # 自定义端口
        share=False  # 如需公网链接,设为True(需网络通畅)
    )


# ====================== 5. 程序入口 ======================
if __name__ == "__main__":
    # 检查权重文件是否存在(提前提示)
    if not os.path.exists(MODEL_PATH) and MODEL is None:
        print(f"⚠️ 警告:未找到权重文件 {MODEL_PATH}")
        print("请先运行ResNet18微调训练代码生成权重文件,否则无法进行预测!")

    # 构建并启动Gradio界面
    build_gradio_interface()
comments powered by Disqus
使用 Hugo 构建
主题 StackJimmy 设计